Showing posts with label Fiskars. Show all posts

Friday, July 15, 2011

Patriotic Thank You

Today I get to share with you my creation for the Counterfeit Kit Challenge's first challenge for July. It is all about embossing-you can dry emboss or heat emboss. I chose to dry emboss, but with a twist. I wanted to emboss a coordinating border for my card. Since I wanted to make my card using leftovers from my 4th of July Add-On, I thought stars would be a fun accent. My only problem: I don't have a star embossing folder. So, I decided to make my own embossing plate.
First, I found a thin piece of chipboard (this piece came in a package of Stampin' Up patterned paper.) I trimmed the chipboard to be slightly larger than my card front. Then I used a star punch to punch 6 stars from the leftover chipboard. I arranged 3 of the stars on my chipboard base, then adhered them down. Because the chipboard was so thin, I stacked another star on top of each on the base and adhered them so that I could get a deeper impression.
Then it was time to emboss. It took a little trial-and-error to come up with the right "sandwich" for my embossing plate, but here is what worked for the thickness of chipboard that I used. You may need to adjust your "sandwich" if your chipboard or cardstock is heavier than mine. I started with Tab 1, one clear cutting pad,and the homemade embossing plate. (Make sure the star punches are facing UP.)

Next, I stacked my kraft cardstock on top of the embossing plate, making sure that the edges were placed slightly inside the edge of the embossing plate.

The next layer is the black silicone pad that I use with my Sizzix embossing plates.

The final layer is the hard black plastic pad, also used with the Sizzix embossing plates.

Carefully run all layers through your die cut machine. Here is what the finished cardstock will look like:

To highlight the embossing, I rubbed a Creamy Brown chalk ink pad over the tops of the stars and also around all of the edges of the kraft cardstock. I attached the embossed panel to the front of my card base, then embellished the card with rub-on letters and a handmade bunting embellie.

I love the Americana look, and the tri-color bunting looks slightly vintage. I can't wait to try this embellie using softer colored papers from my main kit. Thanks for stopping by!

Monday, June 6, 2011

June Counterfeit Add-on Kits

I admit that I got a bit carried away this month while I was creating my add-ons for the Counterfeit Kit Challenge. I created a small add-on kit based on the add-on from Burlap & Buttercups, which I shared yesterday with my main kit. When I was looking through some of the other kit clubs, however, I found that I really loved the Studio Calico Star Dust Add-on. After I assembled my main kit, I realized that I could counterfeit the Star Dust Add-on and have it coordinate with my main kit. So this month I have a mix of two kit clubs. Here is my counterfeit Star Dust Add-On:Everything was pulled from my stash or handmade. I really wanted to include a chicken wire background stamp, but didn't have any stamps in my stash that would work. My solution: an onion bag (thanks, Lesa!) I created a frame from a scrap of chipboard, then adhered a piece of the onion bag over the center of the frame. To use this, I applied ink to one side, placed it ink-side-down on my paper, then rolled a brayer over the top. It worked great! Can't wait to try this on a project!


Here are my counterfeit tin pins. I had one package of buttons to cover leftover from last month's kit, so I decided to cover them with paper to make my version of the tin pins. I used a cloth to slightly dampen my paper, then covered the buttons. I then applied a layer of Glossy Accents, and they look very similar to October Afternoon's tin pins!
These are the tapes that I made in place of the Smash Tape. I used some old first aid tape, and stamped the checked background with teal and red ink. I then used some different stamps from my stash to add words, phrases, and numbers. I'm not quite sure what I will use these for yet, but they were fun to make! Note to self: need more first aid tape. :)

Finally, I counterfeited the Kitch brads from the inspiration kit. I simply cut or punched circles from patterned paper scraps and placed them inside the rim of these buttons. I then covered the paper with Glossy Accents. Super easy, and no one will ever know that they are buttons, not brads, once they are on my projects!

I also made a Summer Add-On so that I can play along with Kim's Summer challenge later this month. I have had my eye on Echo Park's Splash collection for a while, but I simply couldn't justify buying it when I still have lots of last summer's paper in my stash! So I decided to counterfeit the Splash collection (instead of a kit) as my Summer Add-On. I had so much fun making the journaling blocks and the ticket embellies. You can see the "real" Splash collection from Echo Park HERE. Here is my counterfeit Splash kit:
I'm excited to use my kits to make some projects! If you haven't played along with the Counterfeit Kit Challenge, you are missing out! Check it out HERE. I know you'll be inspired!

Friday, May 6, 2011

The Greeting Farm Presents...A New Lily Pad Challenge!

It's Friday, so that means the Lily Pad Dream Team has a new batch of cards to inspire you, plus a new challenge and a new sponsor! Our challenge this week is another gorgeous color combination from Kathy-a collection of soft, muted colors that would be perfect for a Mother's Day card or any spring project.
Not only do we have a great color combo for you, but our sponsor this week is none other than The Greeting Farm! I have been in love with TGF's adorable images since I first saw them about a year ago. The sweet characters fit in perfectly with my cutesy card style! My card this week features a sweet digi stamp-it's called "Kissy Kissy".

It's true that these images are perfect for coloring. I am just learning how to use Copics, however, so my colors (and skill) are quite limited! My image is entirely paper-pieced, using scraps of cardstock and some Distress Ink. A touch of Crystal Stickles "eyeshadow" finishes off the image.
I hope you will all join us this week for our Color Throwdown! You can see all of the details, as well as the rest of the Dream Team's gorgeous cards, HERE.

Friday, April 15, 2011

Counterfeit Kit Challenge-Memorabilia

I am so excited to share my very first chipboard mini album with you! I had so much fun making this-I can't wait to add my photos and memorabilia! I can't yet because I made this album to document my upcoming weekend at CKC-Manchester with my scrappy friend, Lesa!

The page above has a fun pocket on the right-hand side. Recognize it? I "stole" a leftover pocket from my March kit! Then I dressed it up a bit with alpha stickers, a border sticker and some gems. This pocket will hold my class stubs from Friday and any other items that I want. The pocket is 5" wide.
This page also includes a fun pocket to hold memorabilia, probably the stubs from my Copic classes. Can you spot it? It's my mini transparency! I need to tell you how I made this transparency on a budget! I recently transferred all of my Imaginisce Snag 'Em stamps to a Cropper Hopper folder. Each stamp had 2 square transparencies in the package-one printed with the design and one that was "plain". Being the frugal scrapper that I am, I had to save those plain ones! They were the perfect size for the heart stamp that I used for this kit. I stamped the image with black StazOn ink, then colored the back side with Bic Mark-It markers. Then I trimmed around the top of the heart to add a fun edge and stitched it to my paper. Cute little free pocket!

And did you see the zipper flower! It was SO easy! I made it using Becky Olsen's tutorial, but I used Glue Dots instead of the double-sided tape that she recommends. Worked great!

Thanks for stopping by to check out my mini! Don't forget to visit the Counterfeit Kit Challenge blog for the other designers' takes on this challenge!

Tuesday, March 29, 2011

Lily Pad Cards Blog Hop


Good morning, Hoppers! Welcome to your first stop on Day 2 of the Lily Pad Cards Blog Hop! Today's cardmakers are literally going to make you ribbit out loud! Each day, the hop will span 7 different blogs, then culminate on Friday, April 1, with the grand opening of Lily Pad Cards. Lily Pad Cards is a new challenge blog that will feature interviews, articles, videos, challenges, great prizes, and more!

Although Lily Pad doesn't officially bloom until April 1, 2011, you'll be able to see a new sneak peek every day until then. And you'll definitely want to drop by because there are three prize packages with a total retail value of over $800 (WOW!)-including $100 worth of gift certificates to a very popular online store! Go HERE for specific prize details and contest rules.

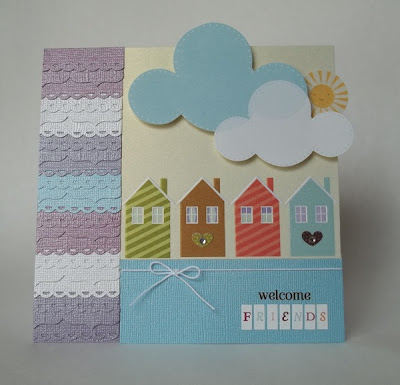
The theme of our hop is "welcome"-not only are we welcoming Lily Pad Cards to the neighborhood, but we're also welcoming all of you to come in and join in on the fun.


Thanks for being neighborly and hopping by my pad today! Your next stop on the hop is the incredibly talented Jill Foster: http://www.stampinginspiredby.blogspot.com/. If you hit a bad link, you can always hop back to the Lily Pad and click on the next link in the hop. We'd also appreciate it if you would report any bad links to webmaster@inlinkz.com.

Happy hopping!

Monday, February 14, 2011

Welcome Home


The challenge over at All Things Unity this week is to use your favorite Unity or {ippity} set. HERE is the link. I have lots of favorites, so it's hard to choose just one! Right now, however, I find the one that I'm using most is Devoted by {ippity}. I love the house, especially! Lots of paper piecing on this card-everything on the house. I also used two other {ippity} sets: Just Wanted to Say and Live Simply.

Love these sets as much as I do? You can order them from me! Just visit my {ippity} site by clicking the link at the top of this page or visit http://www.sharecropperskits.blogspot.com/.

Sunday, December 26, 2010

Sew Sweet Thank You Card


We are all recovering from the busy holiday, and in Maine we are gearing up for our first big snow of the season. I love snow, so this makes me very happy. :)

Our family is also taking today to play with our "toys". With 2 teenagers, this means lots of electonics, lol. My husband is enjoying the fact that he is in control of the TV today, and I am playing with lots of stamps, ink, and other crafty things. I am also happy that this is a vacation week for me, so I will get to play along with some of the online challenges that I have missed so much this past semester!

Today's card is based on two challenges: the Skipping Stones Design Sketch #56 and the Curtain Call Color Challenge: Act 62. Check out the links to these challenges and play along! For this card, I used stamps from Lawn Fawn and Unity Stamp Co., and papers from Cosmo Cricket and Momenta.

Wednesday, August 18, 2010

Just a Note(card)


Good morning! Today I have a cute little notecard to share with you using DeNami's Apple Basket stamp. This is one of my favorite stamps from the new release. (I say that about every stamp, though!)

I decided to try something different with my card. I decided to make a notecard instead of a card that opens. You simply jot a note on the front.-perfect for busy teachers! I can imagine several of these bundled together with jute or red-and-white baker's twine as a back to school gift for a favorite teacher. I may have to make up some of these before school starts in a couple of weeks!

Stamps used on this project: Apple Basket and All Occasion Sentiments by DeNami Design. Border Punch: Lace and Lattice Border and Corner Punch by Fiskars.

Please check out the DeNami blog to see all of the DT's fabulous projects using the Apple Basket stamp!

Saturday, July 31, 2010

DeNami Projects


Sometimes I get carried away with my cardmaking and forget to do things-like post the finished cards. :) As I was using my DeNami stamps this morning, I realized that I had a couple of cards made using some DeNami images that were just sitting on my camera's memory card, waiting to be shared. Here are two projects that I haven't blogged yet. I will have at least one more card to share with you later today, using some supplies from the New Releases from July 1st.


The first card is one I made when I first got my new Halloween stamps. I just love the little Trick-or-Treat Chickies! I tried something different on this card by stamping the image on kraft cardstock instead of white, then coloring it with colored pencils. I think it gives it somewhat of a vintage Halloween look. I also stamped the little jack-o'-lantern face from the Halloween stamp set randomly on the bottom of the card, then added a glow around each face with some orange chalk. Leaf green cardstock and some of my favorite buttons (I used Tangerine on this card) add more of that vintage holiday look.


For my second card, I was inspired by Ayana's owl card to create a window. I haven't done one of these for a while and had forgotten how much I love have the image visible when you open the card. I used the Rosebud Trio, colored it with markers, then punched a mat using the same Leaf Green Cardstock. This color, along with the Amethyst Cardstock that I used for my card base, were both part of the new release from July 1st. These colors look so pretty together. I finished the card with a simple ribbon bow and an Amethyst Boutique Button.


I will also be back in a couple of hours to share my project for this week's Wee Memories Challenge! You won't want to miss out-Cosmo Cricket is our awesome sponsor this week!

Thursday, July 22, 2010

Lawn Fawn Dress Form


I broke open another new set of Lawn Fawn stamps this morning and decided that they were perfect for a couple of challenges I wanted to try. First, I thought that the dress form stamp from the Sew Lovely set would look great using the color combo from Off The Wall Craftiness, which was pale pink, grey and white/cream. The inspiration for this color scheme came from the inspiration photo above. I knew as soon as I read this color combo that I wanted to use this new pale pink glossy paper from Club SEI. It was perfect for the fancy little dress image. I also stretched the color scheme to include some silver cardstock from a Wausau paper ad. (After all, silver is a variation of grey, right?) Even though I stretched the color scheme that way, it doesn't detract from the card's color combo. It simply adds a bit of shine and visual interest.

I also followed a sketch from the DRS Design Rubber Stamps blog. This sketch is very versatile and could easily be adapted for many different images. I like that there are nice clean lines in this sketch. I added a little bit of flair by using a Fiskars border/corner punch to the gray mat.
Thanks for stopping by tonight. Be sure to check out my next post, too, for another card that I made using this elegant color combo.

Tuesday, July 20, 2010

It's Twins!


Not for me (thank goodness!) but for friends of ours. I made this card for them as a congratulations card. The babies are expected any day now-Mom's been to the hospital several times but they keep sending her home. :)

I used this week's sketch from the Unity Hippity Hop challenge, which also fit in perfectly with the Papertrey Paper Dolls Challenge #11. The challenge was to create a non-standard sized card. Basically, anything except A2 size. My finished card is 4"x8".

I used Unity's Little Me stamp set which I got a steal on a couple of weeks ago. $4! The set is adorable, and contains 8 stamps. I changed it up a bit by stamping the Mom/baby image twice, then using just the baby from the second image. Because our friend is expecting twins, I needed that second baby! So I put him in Dad's arms. This set was also perfect because it included the little boy and our friends also have a little boy, Oliver.
Other supplies on this card: "congrats" rub-on (congratulations, trimmed) by Pebbles, Inc., patterned paper by Creative Imaginations and Around the Block, ribbon (recycled from pj packaging from Target!), aqua button by DeNami Design. It's hard to tell from the photo, but I also added white flocking (Studio G) to the baby blankets.

Thanks so much for stopping by today (again!) I've been super-busy today creating cards for DTs, challenges and personal use. Now to put everything away, LOL!

Up for a Challenge?


A sketch challenge, that is, from DeNami Design. :)

This week's sketch was created by Jenny and is so versatile! I literally could have used any stamp I own (which is quite a few, LOL) to create a card. I chose the Fancy Butterfly from DeNami and paired it with Sky Blue Cardstock and white dotted swiss cardstock. I think it came out elegant, don't you?

We'd love to have you join us over at the DeNami blog for this week's sketch challenge! All you need to do is create a card using the Jenny's sketch. The prize? DeNami goodies, of course! Happy stamping!

Tuesday, July 13, 2010

Ippity Class


This weekend I held my first class featuring Ippity's "Fall for You" stamp set and papers by My Mind's Eye. The class had a great turn-out...the house was a bit crowded and hot but I think (hope!) everyone had fun. My favorite part was seeing my scrappy friends. We just don't get together enough!

For those of you that would like to order a kit for this class (includes stamp set and all papers/embellishments) the cost is $25. I am currently sold out of this stamp kit, but I will be placing another order next week.

For those of you that attended but would like typed instructions, I will be emailing them to you soon. Thanks again for coming!

Friday, March 5, 2010

Can you stand another owl card?


You know me and my owls. Just love 'em. In a recent issue of Creating Keepsakes, someone shared a great idea for using the Leave it to Weaver border punch from Fiskars. The trick is to punch borders on two different colored strips. With one of the strips, cut off the edge of the paper right down the center of the punched cut-outs. Then layer this border over the whole one. Voila! A two-tone border that you can use with ribbon. So very clever! Here's my take on this technique. I also used buttons in a different way on this card-I stamped the owl image a few times and paper-pieced him. With one of the stamped images, I cut out just his eyes and mounted them on top of two side-by-side buttons. Gives him the big-eyed look. He's just too cute, don't you think?

All of the papers, flocked die-cuts, twill and buttons for this card are from SEI (Playground Collection) and the owl stamp is from Hero Arts.

Friday, January 22, 2010

Some fun Valentine's Day cards...


to share with you today. I made these mini cards using up some spare stamped pieces and scraps. So easy!

First, I started with one white A2 size card (4.25" x 5.5"), then I cut it in half. The result: two 2.75" x 4.25" mini cards, already folded. More bang for your buck, as you're making two cards from one. Plus, the smaller surface makes them perfect for using your scraps!

For each card, I adhered a small scrap of kraft cardstock to the top, then a small punched border directly below that. I adhered a scrap of ribbon around the card, letting the ends extend beyond the card. (The ribbon is not tied-just adhered.) I also added a button with thread tied through on top of the ribbon-just attach it with a glue dot.

For the images, I stamped the frog and the owl (both from Hero Arts) on patterned paper and cut them out. I added some pink chalk to the frog's cheeks, and used a red colored pencil and a white gel pen to accent the owl. I wanted to add fun touches to each image, since these cards are for my kiddos. The frog got a little tiny heart "kiss" on his cheek-the heart is actually a tiny heart left behind after I used a Martha Stewart heart border punch. I used a glue stick to attach it to his cheek, then added a bit of Fruit Punch stickles. For the owl, I also added some Fruit Punch stickles to the wing, but the fun part was adding the pink, eye-lashed googly eyes. I found these at JoAnn Fabrics. So cute!

You can add whatever you'd like for sentiments near the top. My "Happy Valentine's Day" stamp is from Studio G, while the "I" and "you" are from Technique Tuesday. The heart is from Hero Arts.

I'd love to see what you come up with for mini cards using your scraps. If you'd care to share, email me a link to your card and I will share the link on my blog. Be brave-we'd all love to see what you create!

Monday, November 23, 2009

Bright Pumpkins


One more Thanksgiving card to share today. This one uses bright colors, plus it pairs orange and coral-who would've thought that combination would look good? But the coral matches the stripe in the patterned paper and looks great in real life.

This card is based on CPS Sketch #143. This is a pretty literal interpretation of the sketch, but I dressed it up a little by folding the green paper over the pumpkin image to give it some dimension. The ribbon, button and twine really spice it up.

These pumpkins are from Studio G, and the "Heartfelt Thanks" sentiment is from Hero Arts. All papers are by My Mind's Eye.

Sunday, November 22, 2009

Happy Holidays Swivel Card


I think I have enough scraps in my scraproom to last me (and every other papercrafter in Maine) for an entire lifetime. While I love to buy new patterned papers-they're my weakness-I also feel good about using up my scraps sometimes, too. This card was made using all scraps or salvaged items from projects that just didn't work.
This card is based on a sketch by Becky Novacek from the Fiskars website. I changed it a bit, but the general design is the same. Best of all, I used just scraps to make it. The card itself is actually two photo mats that I had leftover from a scrapbook layout. I trimmed them slightly so they were both 4" x 5.5", then rounded the corners. After embellishing the card front, I attached the two cardstock pieces together with a large brad, forming the card. As you can see, it opens by swiveling.
Cardstock by Bazzill (brown) and The Paper Company (white); patterned paper: red and green speckled (unknown-I've had it for about 10 years!), green swirl (American Traditionals), polka dots (Heidi Grace); stamps (Hero Arts); pompom trim (Offray); red stickles, wire, pop dots.
This is also my entry for the Hero Arts "trimmings" challenge on the Hero Arts blog. Be sure to check it out for lots of great ideas for using your "trimmings" (scraps).
Oh, and if you haven't checked it out yet, please go see my article at www.scrapbooking.com. I have a set of three cards for kids featured this month. The article will up until November 30th. Beginning Dec. 1, the site will be featuring a set of three of my holiday cards as well. Very exciting!