I admit that I got a bit carried away this month while I was creating my add-ons for the
Counterfeit Kit Challenge. I created a small add-on kit based on the add-on from
Burlap & Buttercups, which I shared yesterday with my main kit. When I was looking through some of the other kit clubs, however, I found that I really loved the
Studio Calico Star Dust Add-on. After I assembled my main kit, I realized that I could counterfeit the Star Dust Add-on and have it coordinate with my main kit. So this month I have a mix of two kit clubs. Here is my counterfeit Star Dust Add-On:

Everything was pulled from my stash or handmade. I really wanted to include a chicken wire background stamp, but didn't have any stamps in my stash that would work. My solution: an onion bag (thanks, Lesa!) I created a frame from a scrap of chipboard, then adhered a piece of the onion bag over the center of the frame. To use this, I applied ink to one side, placed it ink-side-down on my paper, then rolled a brayer over the top. It worked great! Can't wait to try this on a project!
Here are my counterfeit tin pins. I had one package of buttons to cover leftover from last month's kit, so I decided to cover them with paper to make my version of the tin pins. I used a cloth to slightly dampen my paper, then covered the buttons. I then applied a layer of Glossy Accents, and they look very similar to
October Afternoon's tin pins!

These are the tapes that I made in place of the
Smash Tape. I used some old first aid tape, and stamped the checked background with teal and red ink. I then used some different stamps from my stash to add words, phrases, and numbers. I'm not quite sure what I will use these for yet, but they were fun to make! Note to self: need more first aid tape. :)

Finally, I counterfeited the
Kitch brads from the inspiration kit. I simply cut or punched circles from patterned paper scraps and placed them inside the rim of these buttons. I then covered the paper with Glossy Accents. Super easy, and no one will ever know that they are buttons, not brads, once they are on my projects!
I also made a Summer Add-On so that I can play along with Kim's Summer challenge later this month. I have had my eye on Echo Park's Splash collection for a while, but I simply couldn't justify buying it when I still have lots of last summer's paper in my stash! So I decided to counterfeit the Splash collection (instead of a kit) as my Summer Add-On. I had so much fun making the journaling blocks and the ticket embellies. You can see the "real" Splash collection from Echo Park
HERE. Here is my counterfeit Splash kit:

I'm excited to use my kits to make some projects! If you haven't played along with the Counterfeit Kit Challenge, you are missing out! Check it out
HERE. I know you'll be inspired!

 I loved the clean design of the layout and knew that it would work well with the photo that I wanted to scrap. I substituted some of my favorite papers and a journaling box for the extra photos in the ad. The background is embossed cardstock from Core'dinations. I lightly sanded it to show the texture. This photo is of my dad and some of his brothers and sisters (taken around 1937). My dad is the little blonde on the right, next to the pink flower. :)
 Challenge #2 for the blog hop was to make an "I" page. I immediately though of my Pinterest boards, which I labeled like Apple products (like the iPod and iPhone.) My boards include iBake, iSew, iScrap, etc. I also lifted this design from a layout that I have "pinned" on my iScrap board. Notice the subtle background stamping on the gray background? I did that with my homemade chicken wire stamp! The metal clips were leftover from my May kit.
 My last layout was for Challenge #3, "Get in Shape". The challenge was to use a shape as a design element on your page. I had included this large chipboard heart in my kit and knew that it would be perfect for this challenge. I inked it with Creamy Brown chalk ink and then stamped a small branch with heart-shaped leaves all over with brown ink. I also realized that I used all patterned paper for this layout-the only cardstock is my background, but you can't see it because it is covered with patterned paper strips! I can't remember ever making a project using only patterned paper. I really like the look-it reminds me of an old quilt. :) These photos are of me and my parents last summer.
 Thanks so much for stopping by today. Today is my last "free" day before a very busy holiday weekend. I hope to get lots of scrapping done!

 Can you believe that it is June already? Or that the Counterfeit Kit Challenge is 6 months old? This month, we are counterfeiting our 6th kit! It's a beautiful kit from a a brand-new kit club called
  I almost always start with my patterned papers. This month, I didn't have many papers that matched up well with the inspiration kit. I chose one paper from the inspiration kit to counterfeit (the doily print) and then built my kit around that paper. I chose the circle print that you see in the lower right corner of the photo above. It is a new print from Simple Stories, and I just love it. I knew that it would be the perfect paper to inspire my kit. My other papers were also loosely inspired by the inspiration kit, keeping in mind my own style and coordinating with my doily paper.
 The inspiration kit didn't include a ton of embellishments, so I added some extras. :) Instead of the Maya Road square chipboard frames, I included three scalloped circle chipboard frames and centers from Technique Tuesday. While I had the packages of chipboard out, I saw this large scalloped heart frame, also from Technique Tuesday. Although there was nothing like this in the inspiration kit, I loved it and knew that it would look great with my kit. It's also one of those embellies that I've been "saving" for the perfect project. I'm trying to get rid of that mentality! It is my goal to use that pretty frame this month!
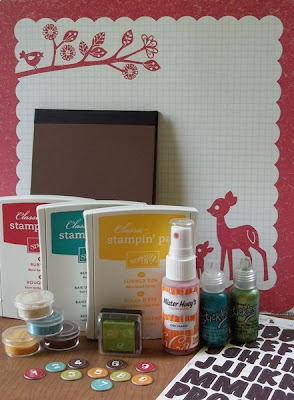 This add-on kit is inspired by the Burlap & Butterflies add-on. I didn't counterfeit many of the stickers-again, I wanted to make sure that I would use what I made. Instead, I saw one of the stickers had individual circles with letters in them. I found some chipboard circle stickers with numbers on them in colors that coordinated with my kit. I added them, and I already have a project in mind to finally use them! I also pulled coordinating inks, stickles, and flocking.


