Tuesday, March 29, 2011

Lily Pad Cards Blog Hop


Good morning, Hoppers! Welcome to your first stop on Day 2 of the Lily Pad Cards Blog Hop! Today's cardmakers are literally going to make you ribbit out loud! Each day, the hop will span 7 different blogs, then culminate on Friday, April 1, with the grand opening of Lily Pad Cards. Lily Pad Cards is a new challenge blog that will feature interviews, articles, videos, challenges, great prizes, and more!

Although Lily Pad doesn't officially bloom until April 1, 2011, you'll be able to see a new sneak peek every day until then. And you'll definitely want to drop by because there are three prize packages with a total retail value of over $800 (WOW!)-including $100 worth of gift certificates to a very popular online store! Go HERE for specific prize details and contest rules.

The theme of our hop is "welcome"-not only are we welcoming Lily Pad Cards to the neighborhood, but we're also welcoming all of you to come in and join in on the fun.
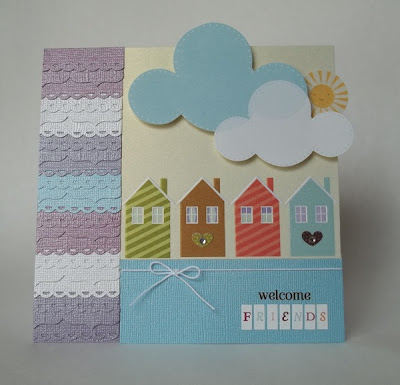

Thanks for being neighborly and hopping by my pad today! Your next stop on the hop is the incredibly talented Jill Foster: http://www.stampinginspiredby.blogspot.com/. If you hit a bad link, you can always hop back to the Lily Pad and click on the next link in the hop. We'd also appreciate it if you would report any bad links to webmaster@inlinkz.com.

Happy hopping!

Monday, March 28, 2011

Counterfeit Kit Blog Hop


Welcome to your next stop on the Counterfeit Kit challenge Blog Hop for the month of March! If you didn't start at the very beginning, you will want to head on over to the Counterfeit Kit Challenge Blog. We have lots of great scrappers participating this month-you won't want to miss a single hop!

Our mini challenge for the blog hop was to scraplift ourselves. I don't do this very often, so this was a fun challenge for me. I knew right away that I wanted to scraplift this gift bag that I made for my mom's birthday back in January:


I really loved this project-the stamps, the label shape of the bag topper, and the fact that it was a fun way to give a gift. I tried to think of a way to make the bag differently. I was a little stuck, but I was quickly inspired when I saw the cute little boxes that Backyard Farms uses for their tomatoes:

I loved the die-cut fence on the front and the fact that it was made from kraft cardstock. Being the frugal girl that I am, I decided to take the elements that I loved from my gift bag and use them to create a gift box. Here is what I came up with (my sweet daughter even baked some Double Chocolate Chunk cookies so my box wouldn't be empty for the hop!)

Everything (except the box and the cookies) came from my March Counterfeit Kit. I hope that you like the project and are inspired to upcycle your produce packaging, too! Your next stop on the hop is with the fabulous Karen Williams. Don't forget to leave some love along the way!

Wednesday, March 23, 2011

Counterfeit Kit Challenge-Frames


I have admitted many times that I have a seemingly endless supply of chipboard. It was one of those supplies that I bought a TON of when it first became popular, but didn't use very often. I just WANTED it. Now I am trying to use it more often-tyring to make a dent in that stash!

For our "Frames" mini challenge, I turned to my stash of chipboard. Many of you may consider this to be cheating, since the chipboard is not technically part of my kit. I keep my chipboard in the original 12x12 packaging, so it would be difficult to fit in with my kit. Also, I figure ANYTHING that will help me to use up my stash should be legal, lol! So I keep my chipboard sheets hanging in my scraproom closet, readily accessible.

Although I loved this scalloped chipboard frame, it was a little overwhelming for my 8.5x11" layout, especially since I wanted to include at least two photos. So, (gasp!) I CUT one side off of that pretty chipboard frame. Of course, I couldn't bear to throw it away-I tucked it into my kit to use on another project later this month. :)

This was a naked chipboard frame, so I first painted it with acrylic paint, then used Versamark ink and iridescent embossing powder to give it some shine and sparkle. I finished my frame by adhering a little aqua gem in the hole of each scallop.

How will you include a frame on your project? I can't wait to see your takes on this challenge!

Saturday, March 19, 2011

Just Wanted to Say "Hi"...


Just a quick share today of a card that I made this week using my March Counterfeit Kit, a cute digi stamp from Tiddly Inks, and a fun sketch from Twisted Sketches. I have had this little hedgehog saved in my digi stamp folder for a while now. Isn't he the cutest? A friend of mine recently lost someone very near and dear to her, and since she loves hedgehogs, I thought I would drop her this little note.

These aren't colors that I would have ever though to put together without the help of my Counterfeit Kit, but I love the finished card! I especially love the punched borders. These are two that I punched when Lesa, Cindy and I had our Punch & Lunch last month. I love having these borders all punched and ready to go! I added a tiny row of machine stitching across the flower border, then topped each flower with aqua gems. I think it adds a sweet, girly touch to this card. I hope it makes my sweet friend smile. :)

If you haven't checked out the Counterfeit Kit Challenge Blog lately, you need to head on over! Right now, we have an Etsy-inspired challenge going on, plus all of the new DT members are being introduced over the next few days. Stop in and say "hi"!

Wednesday, March 16, 2011

Some fun news to share!

Did you hear the news? I am currently the Guest Designer at the Counterfeit Kit Challenge, and I get to stay on as a member of the new Masters of Forgery Design Team! I am so excited! I had given up most of my design commitments during my student teaching last fall, and I am anxious to start up again. I've got something else exciting in the works, but I can't share yet. Soon, girls, I promise! ;)

Monday, March 14, 2011

Mini Challenge: Etsy Inspiration


This week's Counterfeit Kit Challenge is to be inspired by a project from Etsy. HERE is the project that I chose. I have always loved the look of printer's trays, but finished ones tend to be a bit pricey. I knew I could make my own for a fraction of the price. To save even more money, I found a small shadowbox at Goodwill to alter. The price was definitely right: 45 cents!


Here is a before photo:

Pretty outdated and dusty, huh?
Here's what it looks like now:
Here are the details:
Top left: I cut this butterfly from my lace paper, but the color just didn't "pop" like I wanted it too. So, I covered the butterfly with Versamark ink and heat embossed it twice with silver embossing powder. Two bling brads form the body.
Top right: I stamped the sewing machine on a piece of clear packaging (from the Bella Blvd. fabric flowers.) I then paper pieced just the body of the machine and added an epoxy brad and some stickle-y thread. For the "fabric", I cut a little slit in the transparency and threaded a scrap of rickrack through.
Middle left: Just a rub-on and gems on a Spellbinders die-cut.
Middle right: I cut a Spellbinders die-cut in half, then distressed the edge so it looks like a tiny notebook edge. Studio G stamp and butterfly punches, plus a little doily that I created with an EK Success border punch.
Bottom left: My favorite! I stamped the dressform on the same clear packaging from the flowers and paper pieced the dress. The text flowers are just two punched flowers, adhered together with a foam square and topped with a button and gems. The little metal flowers are my soda can flowers. :)
Bottom right: I trimmed a corner off the stamped doily from my kit, then topped it with a butterfly rub-on on white cardstock. I popped the butterfly up with foam squares. I love this punched flower, too. I layered three Martha Stewart flower punches, attached an epoxy brad, then "squished" the petals up to give it some dimension. The tiny stamp is from an old (uninked!) Studio G set.
Thanks so much for stopping in today! I hope you can join us for this challenge this week! Check out the details at the Counterfeit Challenge blog!

Sunday, March 13, 2011

My Counterfeit Wildflowers Kit

With this kit, I once again started with one paper, inspired by the Studio Calico kit. I chose the butterfly print from Basic Grey, then found some coordinating papers similar to the inspiration kit. My lace paper has butterflies, which went perfectly with this kit! I printed the sign language and song cards from websites, and I was AMAZED to find the images identical to those in the inspiration kit! Glittery die-cut letters and vellum sentiment stickers from Momenta, and lots of fabric flowers from my stash complete this kit. I am hoping to try some fun things with Meridy and Bethany's flower tutorials, but I really want to use up these flowers, which have been in my stash for too long. :)
Be sure to stop back tomorrow, when I reveal my project for our Etsy-Inspired Challenge!