Monday, February 28, 2011

Counterfeit Kit Blog Hop

Welcome to your next stop on February's Counterfeit Kit Blog Hop! You should have arrived here from Melissa's fabulous blog. If not, make sure that you start the hop right at the Counterfeit Kit Challenge blog so you don't miss any of the amazing projects!


This month's inspiration kit was from Scraps of Darkness. You can see photos of the inspiration kit HERE, and you can also check out my blog post HERE that shows the contents of (and the logic behind) my counterfeit kit. Here are a couple of projects that I've made with my kit.

Here is the sketch from Scraps of Darkness:

And here is my layout:


It's hard to see in the photo, but I finally used my Perfect Pearls mists! I sprayed the background and the brown chipboard flourish with Interference Red mist. So pretty when the light hits it!

I also made a couple of cards (of course!) The first uses supplies from my kit plus a cute little button card stamp from Unity Stamp Co. I'm embarrassed to say that I've had this stamp for a few months and didn't know what it was, lol. I just saw a new set from PTI that had a similar stamp and realized what it was! Now it is one of my favorites. :)

The next card was actually the first project that I made using my kit, back at the beginning of the month. The card base is made from the postage stamp die cuts (from the Create a Critter Cricut cartridge). The flower and sentiment stamps are from Ippity. If you would like these stamp sets, I happen to know a *fabulous* Ippity chick. ;) Plus, I think I finally achieved the vintage look with these two cards!
I am so very glad that you had a chance to hop along with us today. I'd love it if you left me a comment, too! Your next stop on the hop is the amazingly talented Marianne!

Saturday, February 26, 2011

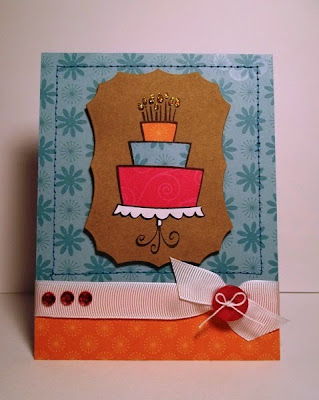
A Fun Birthday Card


I can share this one with you now that the recipient FINALLY got it in the mail! I am really good about MAKING cards, but not-so-good about actually MAILING the cards. Many of you know this about me. ;) I should probably just stamp every birthday card I make with a belated birthday sentiment, just to be on the safe side.
This card uses Lawn Fawn's "Bake Me a Cake" stamp set and fun new papers from Momenta. Lots of paper piecing here, which is one of my favorite techniques ever. I think it comes from my love of patterned paper (and the hoarding of said paper!)
Thanks for stopping by!

Wednesday, February 23, 2011

My first layouts of 2011!


It's been months since I've made scrapbook layouts. I was inspired by the Counterfeit Kit Challenge blog to finally make a page. Guess what? I made 2! I will share one here today which uses mostly Jillibean Soup and Pebbles, Inc. products. I also used a PageMaps sketch that was shared in the Scrapbook Daisies forum. The other page (made with my Counterfeit Kit) will be shared here on Monday as part of the Counterfeit Kit Challenge blog's monthly blog hop.

Just a quick share today. Many of you know that this has been a very traumatic and hectic week for my family, as my older sister passed away Sunday from complications of pneumonia and leukemia. Trying to keep things as normal as possible, but it's tough. There have been some really rough moments over the past week. Thanks to all of you for sharing loving thoughts and hugs over the past few days. Hugs to you all. xoxo

Thursday, February 17, 2011

Tall Oaks


Just a quick share this morning before I head out. This is a simple card, stamped only with brown ink and then shaded with a few colors of colored pencils. I love this look-the colors just seem to pop off the kraft cardstock! The large tree, leaves, and acorn are from DeNami Design, while the sentiment is from Studio G.

Wednesday, February 16, 2011

My Counterfeit Kit for February

I have to admit that this month's Counterfeit Kit Challenge was a huge challenge for me. While I loved the color swatches that Bethany and Meridy posted before the kit reveal, I was very intimidated when I saw the actual inspiration kit. It was totally not my style-not the colors, the patterns, embellies, anything. But I really wanted to play along, so I thought a lot about how I could use the inspiration kit.
I decided to make a list of kit contents, but in a very general way. First, I started with the papers. Rather than try to match the papers in the inspiration kit exactly (which would have been impossible from my stash), I wrote down what the inspiration kit contained: a distressed solid, a flourish/heart pattern, a polka dot, a basic geometric pattern, and three all-over patterns. Now this was a list I could work with! I started with the flourish/heart pattern. I looked through my patterned paper and found this beautiful heart flourish paper from the Bittersweet collection from Basic Grey. This is the paper that I built my entire kit around. I had the matching stripe, so that took care of my basic geometric. I was then able to pull other papers that coordinated. I added a distressed pink solid from Basic Grey (a different line, but still matched), a kraft/cream polka dot, and three all-over patterns: the heart woodgrain (Imaginisce), cream flower (My Mind's Eye) and little fruits (an old Basic Grey line-Recess.) I added one other patterned paper-the numbers-which remind me of the bingo card in the inspiration kit. I didn't end up using the bingo cards from my January kit, so I substituted patterned paper. I think that I am more likely to use this paper than the actual bingo cards.

For embellishments, I found some great printable postcards, tags, and vintage images on Flickr. I also fell in love with the printable doily tags, which I believe were linked on Write. Click. Scrapbook. I also threw in some journaling boxes which were leftover from an SEI album kit.
I found that I didn't include enough letter stickers in my January kit, so I really loaded this kit up with some fun stickers and rub-ons. More mini alphas from Making Memories, a sheet of Basic Grey stickers that have sat untouched in my stash for 3 years (since my very first CKC class!), two different sets of rub-ons from Imaginisce and Cosmo Cricket (thank you, Eryn Hagen!), some pearl flourishes and Momenta Bubbles & Bling. The Bubbles & Bling will work great in place of the mirrored embellies in the inspiration kit, which really weren't my style.

For 3D embellies, I included some chipboard pieces from Colorbok (flourishes) and Fancy Pants, large postage stamp die-cuts which I plan to use for a card base, tiny pearl ribbon slides, and assorted trims. I am anxious to make some of the faux Prima flowers, but I will do that as I make my projects. I also plan on using buttons on my projects, but I found it was just as easy to add the buttons to my kit as I go along. My buttons are all sorted by colors in individual jars, so I can easily just pick what I want. :)

Finally, I added two sets of seriously neglected clear stamps. The smaller set is The Language of Love by Technique Tuesday. The flourishes are from Gel-a-Tins. These stamp sets will work really well with my papers, and I hope that by including them in my kit I will remember to use them!

Thanks for stopping by today. I know this was a long post. Hopefully I have inspired you to think outside of the box a little bit when it comes to finding inspiration in other kits or projects. Can't wait to start creating with my Counterfeit Kit!

Tuesday, February 15, 2011

Yakkity Yak...


This is another of my favorite "rejects" from the recent PaperCrafts pub call. I don't know what it is about this card, but I just love it. Just a fun little card to mail a friend. It's a great way to use a journaling lines stamp, too! I have had this set of journaling block stamps from Autumn Leaves for a couple of years now, and they have been sitting on the shelf, uninked. I paired the journaling block with a Hero Arts speech bubble stamp and some cute little Lawn Fawn stamps. All papers are from SEI. Thanks for checking in!

Monday, February 14, 2011

Welcome Home


The challenge over at All Things Unity this week is to use your favorite Unity or {ippity} set. HERE is the link. I have lots of favorites, so it's hard to choose just one! Right now, however, I find the one that I'm using most is Devoted by {ippity}. I love the house, especially! Lots of paper piecing on this card-everything on the house. I also used two other {ippity} sets: Just Wanted to Say and Live Simply.

Love these sets as much as I do? You can order them from me! Just visit my {ippity} site by clicking the link at the top of this page or visit http://www.sharecropperskits.blogspot.com/.

Happy Valentine's Day!


Today's share is one of my "rejects", lol! It is perfect for Valentine's Day. Around the outside of the spinner, I have stamped "I think you are..." and then the spinner has four different images and cute little words to end the sentence. I just thought this stamp set was the cutest when I saw it at Michael's a couple of weeks ago. I exercised great willpower when I left it sitting there in the $ bin! My sweet daughter had seen me looking at it in the store, however, and surprised me with it after we got home. How sweet is she? I have to finish up a couple other Valentine cards today, so I will hopefully get a chance to share those later.

Stamps are from Studio G and patterned papers are from the Love Me Do collection from My Mind's Eye. Thanks for stopping by!

Sunday, February 13, 2011

Colorful Hello


I realized that I hadn't shared this little CAS card with you yet. I made this card for {ippity}'s January challenge to use brads. I stamped this little flower and hello from the How YOU Doin' set. The hello stamp had a row of little dots underneath, so I used those dots to place lots of little micro brads from Queen & Co. As much as love these tiny brads, I have had them in my stash for 3 years now (since my very first CKC) and it is time to USE THEM UP! I am now down to just a handful and it feels so good to have actually used them!

The flower was stamped on several different solids then paper pieced. I used the solid sides of patterned paper for this one. It is much thinner than cardstock and works great for piecing small images like this one. Easier to cut, too!

A couple of quick snips to the corners made for an easy tag, and then some cute American Crafts ribbon at the top. The tag is then pop-dotted up to give it some dimension. Super easy card-a great one to keep on hand.

Saturday, February 12, 2011

Birthday Cupcakes


Today's card is for my SIL, Jeanie. Jeanie is a cardmaker, too, so I wanted to do something fun! I made this card during the Hero Arts 90-minute Scramble last weekend. The challenge was to make a birthday card with more than one fold. My card has the "main" fold at the bottom, and then the top has a flap that folds down. After scoring my folds, I used my circle cutter to round the flap. Then I covered the card front and the flap using papers from My Mind's Eye's Quite Contrary collection. Such pretty and fun colors! The string and button closure holds the top flap down, and can easily be untied to open the card.
The cupcake and sentiment stamps are all from Hero Arts. I paper pieced the cupcakes and added some Crystal stickles to the frosting. I originally stamped the sentiment directly on the card front, but it just didn't "pop" the way I wanted it to, so I stamped the words again on cardstock scraps, trimmed, and adhered them right over the originals using foam squares.
Thanks for stopping by! I will have lots more shares in the next few days (all of my submission rejects, lol!)

Friday, February 11, 2011

Counterfeit Kit Challenge Cards

I've been MIA for a couple of weeks here in blogland, but I do have a couple of shares today using my January Counterfeit Kit. If you're new to the Counterfeit Kit challenge, you can check it out HERE. It's a great idea-you "copy" the items from monthly kits using items from your own scrapbooking stash! There are also some amazing tutorials for making your own embellishments. THIS post has links to some amazing faux Prima flowers. I can't wait to try them!First of all, this is what my January kit had in it, using only items from my stash and elements that I was able to download for free online. (This is also perfect for me, as I am still on my spending freeze until I get my 365 projects done!)
I have only made two cards so far using my kit. I've been so busy with DT work and magazine submissions that I haven't had a chance to play with it much! I loved the way these two projects came out, however. I don't think that I would have ever thought to pair up some of these embellishments without having them right in this kit. Because I still have tons of supplies left in my kit, I am not going to "dismantle" it yet. I have everything (except my stamps and ink) in a separate paper holder so that I can just grab my kit and get to work.

This first card was for the Card-Bling-Fashion mini challenge on the Counterfeit Kit Blog. I found a picture of a retro red-and-white polka dot sundress online and used it as my inspiration. While making this card, I decided to add a package of white chipboard letters to my kit. I realized that the alpha stickers that I had included were not enough and that I wanted to be able to mix and match alphas on my projects. I also used a chipboard tag that was not in my original kit. I am trying to use up some big packages of chipboard shapes from my stash. These packages are really large and will literally not fit in my kit, so I keep them near my scrap table. Hopefully I can start to make a dent in my chipboard stash!
The second card that I made was for the Sketch Mini Challenge. I took the layout sketch and changed it up a bit to work for a card. Everything on the card was from my kit, and I used the added chipboard letters for this card-but with a twist. The white letters didn't show up on the white journaling block. I knew that I would need to alter them somehow. I looked through my supplies and saw that I had some dark brown flocking from Studio G. I played around for a bit and found that if I flipped over the HI, it looked the same. So, I kept it flipped over and covered the sticky side of the letters with the flocking. Voila-perfectly flocked letters without having to mess with adhesive! Obviously this wouldn't work for all letters, but it will work for some and also most shapes.

I'm excited to start building my kit for February. I'm a bit behind, but hopefully will get to it this morning. This one's going to be a real challenge for me because the elements in the kit are totally not my style so who knows what I will end up with, lol! Maybe I will find things in my stash I didn't even know I had! :)